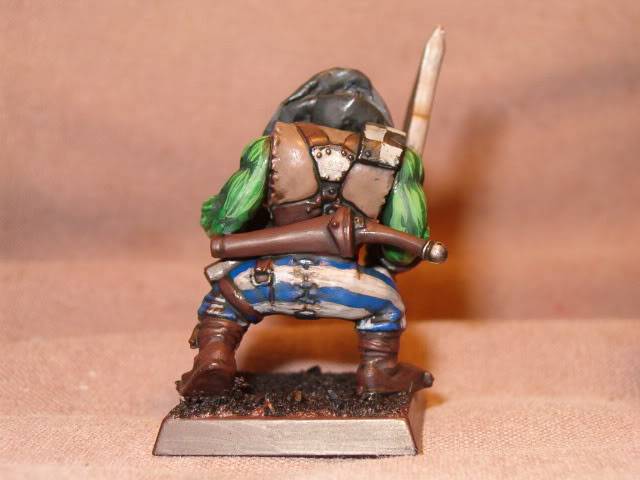
Dazza (on the Flame On forum) asked me to show him I paint Orc skin and I started with this in mind - while I was painting the rest of the model I carried on taking PIP photos so I though I may as well go the whole hog and do a start-to-finish tutorial.
So here goes!
PVA and sand the model's base and leave to dry over night. Undercoat the pirate black and leave that to dry another day. Have patience for Gork's sake!
Paint all areas of exposed skin with
Orkhide Shade Foundation Paint.

Then using a Detail Brush, paint the raised areas of muscle with
Snot Green in thin stripes, following the shape of the muscles. It's actually better at this stage if the stripes overlap a bit and (depending what you pot of Snot Green is like) you may have to paint a second layer to get a good rich colour. Make sure you leave all the recesses of the muscles with Orkhide Shade showing but don't try to get "smooth" edges to the areas of Snot Green - I think it looks better a little bit "ragged".


Using slightly watered-down
Goblin Green paint more thin stripes over the Snot Green, but this time only a few in each raised area - this is the highlight so don't go overboard or the whole thing will look too bright!
I always painting fingers with the lines going across them, rather than along them - I like the wrinkled-skin look this gives.


The skin is finished!
Using a Fine Detail brush (or even a very pointy Detail brush) paint a line of
Blood Red onto the eye.

Then a line of black just under the red. This separates the red from the green and makes the eyes "pop" a bit more. They look more spiteful and malicious to me!

Paint the teeth with
Tausept Ochre (or Spearstaff Brown works just as well).

Paint the tips of the teeth with
Bleeched Bone, leaving the base of each tooth in Tausept Ochre.

Now basecoat the whole of the model in what ever colours you chose. Metalwork just gets
Boltgun Metal for armour and weapons. Earrings, buckles and weapon hilts normally get a
Dwarf Bronze basecoat. The sword hilt on this one is bone though, so I used
Deneb Stone.

I always go for earthy browns, greys and blacks with the odd touch of red but for this pirate I'm doing white and blue striped trousers.

It's much easier to paint the stripes over a solid background colour, rather than trying to paint the twice by filling in the gaps between you first colour! It needs a steady hand to get them even but don't worry - a little practice is all it takes. Any over-painting is easy to correct at this stage as none of the areas have any details yet! (except the skin, so be more careful in areas that border that...)


Leave the paint to dry for a few ours at this point. Metallic paints are tricky things and washing over nearly dry metallic paint is a bad idea. Tiny sparkly particles of paint occasionally get dragged onto non-metallic areas and they look horrible!
Devlan Mud! - every where except the skin and eyes (but I do give the teeth a slosh of it!)
When it's wet it looks pretty grim:


But when it dries it looks amazing!! Now we are nearly finished!


Using a similar technique to painting the texture into the skin, re paint the same colour as the basecoat onto each area, following the shapes of the raised areas and leaving the recesses in the wash-darkened colour.


For metallic areas just paint the basecoat colour onto the sharp edges.

You can also start adding the free-hand details you want, like checks (or crossbones!)


Some areas (by no means all) will look improved by a small amount of further, lighter highlights - a added a little white to the Dark Grey of the beard and picked out a few strands of hair with it.

The stripes didn't need any more than the basecoat colour painted over the wash.

Using
Mithril Silver paint more thin lines onto the sharp edges of sword blades. No other areas of the Boltgun Metal need this final highlight - it makes the blades stand out more that the rest of the metalwork and look sharper!

If you paint towards the edge of the blade it easier to get a point onto each brush stoke, like painting lots of tiny, thin triangles along the blade with the points towards the back of the blade (hope that makes sense!).

Near done now! Add a few simple tattoos if you want - anchors are easy but octopuses, mermaids, fish skeletons and compasses all look very piratey!


I paint names onto the bases of my Mordheim warbands - it makes it easier to keep track of who has what weapons , skills or stats in the heat of the game! U use a Detail Brush and
Skull White.
Now varnish it. I use spray
Purity Seal in a thin layer and it seems pretty tough to me.
The next day (so the varnish is really dry) I paint the base with
Graveyard Earth using a scruffy old brush. The sand really buggers up a good brush!

You have to layer the paint on pretty thickly, so it takes ages to dry. Come back to it tomorrow!
Dry-brush (see I do use dry-brushing!) the sand with
Bleached Bone and sit back to admire your new completed Pirate Orc!


Let me know if you have any questions!!


