| | Wall Textures - Tutorial Request |  |
|
+5playtable HornedRat Pathfinder Dubstyles Admin Tom Pirexian 9 posters |
| Author | Message |
|---|
Pirexian
Elder


Posts : 383
Trading Reputation : 0
Join date : 2010-03-15
Age : 41
Location : Veracruz, México
Personal Info
Primary Warband played:  Middenheimers Middenheimers
Achievements earned: none
 |  Subject: Wall Textures - Tutorial Request Subject: Wall Textures - Tutorial Request  Thu 22 Apr 2010 - 15:39 Thu 22 Apr 2010 - 15:39 | |
| Well, I haven't yet started painting my scenery. So right now I'm thinking what technique to use for the texture walls.
It would be nice to have some sort of tutorial at the forum showing the different results of using different texturing techniques on a surface.
For example, having pictures showing the different results like:
Wall Filler (flat surface):
1.- drybrushed
2.- Washed/ink
Pink Foam texturing:
1.- Drybrushed
2.- Washed/ink
White glue applied with a rough brush:
1.- Drybrushed
2.- Washed/ink
White glue + fine sand:
1.- Drybrushed
2.- Washed/ink
White glue + toilet paper:
1.- Drybrushed
2.- Washed/ink
Plain flat foam core surface:
1.- Drybrushed
2.- Washed/ink
Premade resin/plastic surface (premade building):
1.- Drybrushed
2.- Washed/ink.
etc.
___________________
I don't know, I haven't seen so far a document online like this before. What do you think? It would be nice for noob players like me that have just entered the hobby to have such a reference to better choose the technique for the desired effect.
rawr! | |
|
  | |
Admin Tom
Admin


Posts : 2596
Trading Reputation : 12
Join date : 2007-08-25
Location : Austria/Switzerland
Personal Info
Primary Warband played:  Witch Hunters Witch Hunters
Achievements earned: none
 |  Subject: Re: Wall Textures - Tutorial Request Subject: Re: Wall Textures - Tutorial Request  Thu 22 Apr 2010 - 19:06 Thu 22 Apr 2010 - 19:06 | |
| - Pirexian wrote:
It would be nice to have some sort of tutorial at the forum showing the different results of using different texturing techniques on a surface.
For example, having pictures showing the different results That is a fantastic idea!  So, when will we get this tutorial from you Pirexian?  What I can offer at this point is a link to Cianty's homepage. http://cianty-tabletop.blogspot.com/He does a lot of scenery painting and you may find something you like. _________________  | |
|
  | |
Pirexian
Elder


Posts : 383
Trading Reputation : 0
Join date : 2010-03-15
Age : 41
Location : Veracruz, México
Personal Info
Primary Warband played:  Middenheimers Middenheimers
Achievements earned: none
 |  Subject: Re: Wall Textures - Tutorial Request Subject: Re: Wall Textures - Tutorial Request  Thu 22 Apr 2010 - 20:08 Thu 22 Apr 2010 - 20:08 | |
| I couldn't make each tests :S.. I don't have all the materials for instance (still can't find a local place to buy pink foam...)
But I could go seaching on the web for different pictures of the results... and try making a comparison of pictures and post it on a thread... But then again, the thing is to compare.. you can't really compare the textures and results when a piece is painted with a different tone, the
camera and the lights are set in different way, the surfices are made with different materials and/or paint brands, the paint skills of the author are in different levels, etc..
Thats why I think that it would be best if somebody with the materials (and time) could make just little samples of each technique and take pictures in a controled environmet (?)..
You don't need an entire building for each technique.. Just a flat squre of 10x10cm should be more than enough.. I guess, anyhow this was just an idea xD maybe somebody has already done this and is willing to share ;O;--- | |
|
  | |
Pathfinder Dubstyles
Venerable Ancient


Posts : 778
Trading Reputation : 0
Join date : 2008-04-11
Age : 40
Location : North Carolina, US
Personal Info
Primary Warband played:  Possessed Possessed
Achievements earned: None
 |  Subject: Re: Wall Textures - Tutorial Request Subject: Re: Wall Textures - Tutorial Request  Wed 28 Apr 2010 - 3:45 Wed 28 Apr 2010 - 3:45 | |
| I second this idea, i find myself asking everyone how they textured their walls.
Another method is textured spray paint which works well if you apply unevenly. | |
|
  | |
HornedRat
Elder


Posts : 365
Trading Reputation : 1
Join date : 2008-12-19
Age : 52
Location : Culver City, California
Personal Info
Primary Warband played:  Skaven Skaven
Achievements earned: none
 |  Subject: Re: Wall Textures - Tutorial Request Subject: Re: Wall Textures - Tutorial Request  Sun 23 May 2010 - 8:55 Sun 23 May 2010 - 8:55 | |
| Humm an interesting idea. I personally dont use all those techniques listed. Maybe it would be easier if everyone just posted 1 or 2 of their favorite techniques, why they like it and how they do it?
I will work on getting a few of my favorites over the next few days. | |
|
  | |
playtable
Ancient


Posts : 427
Trading Reputation : 0
Join date : 2009-02-22
Location : Indianapolis, Indiana
Personal Info
Primary Warband played:
Achievements earned: none
 |  Subject: Re: Wall Textures - Tutorial Request Subject: Re: Wall Textures - Tutorial Request  Sun 23 May 2010 - 16:23 Sun 23 May 2010 - 16:23 | |
| Here's one
I buy a bag of dry wall finish plaster. If you use it just for models it will last forever. The premixed plaster will crack easier and spoils after a year or so, and is harder to thin out.
For foamcore walls with some texture I mix the dry plaster in a small dixie cup with water until it is pretty thin. About twice as thin as white glue. I paint it on with a paint brush in a thin layer. You don't even need to cover every piece of the wall.
I see a lot of people putting plaster on their walls way to thick, for me. You don't need very much plaster to break up the smooth foamcore surface. | |
|
  | |
HornedRat
Elder


Posts : 365
Trading Reputation : 1
Join date : 2008-12-19
Age : 52
Location : Culver City, California
Personal Info
Primary Warband played:  Skaven Skaven
Achievements earned: none
 |  Subject: Re: Wall Textures - Tutorial Request Subject: Re: Wall Textures - Tutorial Request  Thu 10 Jun 2010 - 6:50 Thu 10 Jun 2010 - 6:50 | |
| My current texture of choice is premixed concrete patch. There is no need to do any mixing, and you can thin it with water. It also makes a great filler straight out of the tub and dries rock hard. I use lots of cardboard, never had a problem with warping walls etc. Not a recent picture, but this might give you an example. Before...  And after...  | |
|
  | |
Ordo Septenarius
Warlord


Posts : 227
Trading Reputation : 0
Join date : 2010-10-06
Location : Portland, Oregon, USA
Personal Info
Primary Warband played:  Possessed Possessed
Achievements earned: none
 |  Subject: Re: Wall Textures - Tutorial Request Subject: Re: Wall Textures - Tutorial Request  Fri 25 Mar 2011 - 0:28 Fri 25 Mar 2011 - 0:28 | |
| First, apply 1 part tacky glue and 1 part water generously to the wall where you'd like texture.
Use one-ply toilet part (or just pull two-ply apart, since this is more commonly available) and stick pieces to the wall. Great faux-plaster results in about an hour!
| |
|
  | |
Lars Wurst
Champion


Posts : 41
Trading Reputation : 0
Join date : 2012-11-03
Age : 51
Location : Helsinki, Finland
Personal Info
Primary Warband played:  Undead Undead
Achievements earned: none
 |  Subject: Re: Wall Textures - Tutorial Request Subject: Re: Wall Textures - Tutorial Request  Sat 11 Apr 2015 - 22:38 Sat 11 Apr 2015 - 22:38 | |
| Thanks a lot! This was exactly what I was looking for. | |
|
  | |
Quase
Elder


Posts : 329
Trading Reputation : 0
Join date : 2012-05-15
Age : 50
Location : Belgium
Personal Info
Primary Warband played:  Pirates (Unofficial) Pirates (Unofficial)
Achievements earned: none
 |  Subject: Re: Wall Textures - Tutorial Request Subject: Re: Wall Textures - Tutorial Request  Tue 12 May 2015 - 15:09 Tue 12 May 2015 - 15:09 | |
| Only just stumbled across this interesting thread… Textured walls, Quase-style… From reinforced cardboard, I cut out 4 walls and I cut out the windows, regularly proof-fitting the plastic windowframes, to be sure n cardboard was visible behind them, and ensuring I didn't cut holes that were too large 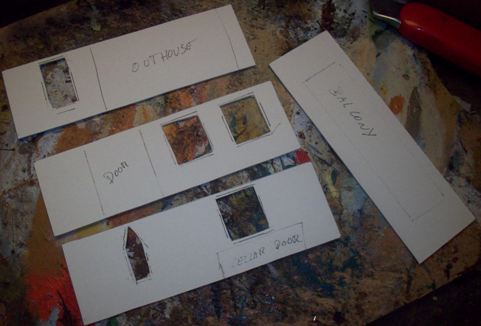 Then I cut out 4 pieces of newspaper in the same size as the walls 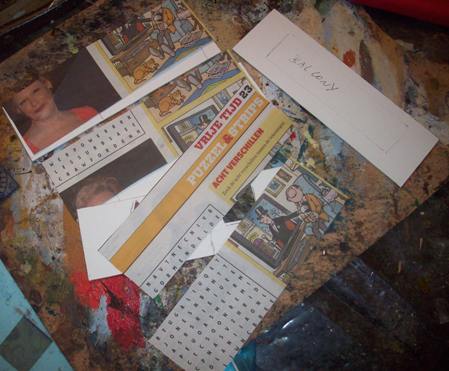 I pressed them together into little balls 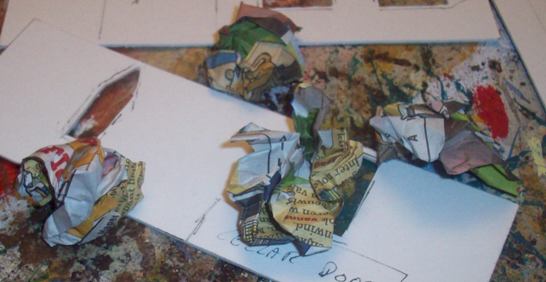 And I flattened them out again and glued them on the walls with watered down PVA. The newspaper will soak up the PVA, making it nice and hard.  The next day (PVA needs it’s drying-time) they had warped a little, but nothing too serious... Will need a way to remedy that, but, first things first, I cut out the windows again, out of the newspapers this time (easy, as the holes were already there in the cardboard)  With the help of a length of my precioussss balsa-wood (which is actually way to expensive to use for this purpose...) I used PVA to reinforce and straighten out the walls. Added bonus of the balsa : it'll give me a bigger surface for when I'll be glueing the building to it's base. Add some clothespins to keep them into place, and call it a night, so the PVA can dry out nice and easy. 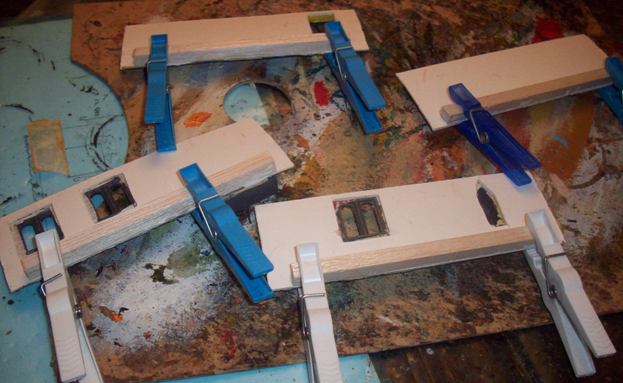 Lots of steps later, I painted the building, and now the walls look like this (paint and drybrush)  | |
|
  | |
Dozer
Warrior


Posts : 24
Trading Reputation : 0
Join date : 2010-05-04
Location : North West Ohio
Personal Info
Primary Warband played:
Achievements earned: none
 |  Subject: Re: Wall Textures - Tutorial Request Subject: Re: Wall Textures - Tutorial Request  Thu 10 Sep 2015 - 1:42 Thu 10 Sep 2015 - 1:42 | |
|  This is one of the first buildings I did . It is very thin pva glue with toilet paper draped over it . I then painted it black and used a heavy dry brush of white and blue leaving a bit of black at the edges to give it some depth . You can make the texture as smooth as you want by taking a wet brush over it while it is still damp . | |
|
  | |
Dozer
Warrior


Posts : 24
Trading Reputation : 0
Join date : 2010-05-04
Location : North West Ohio
Personal Info
Primary Warband played:
Achievements earned: none
 |  Subject: Re: Wall Textures - Tutorial Request Subject: Re: Wall Textures - Tutorial Request  Thu 10 Sep 2015 - 1:46 Thu 10 Sep 2015 - 1:46 | |
| Quase I like that effect you got from newspaper a lot . I am building some new buildings and think I will try it .
How did you do the brick work on the corners ? | |
|
  | |
Sponsored content
 |  Subject: Re: Wall Textures - Tutorial Request Subject: Re: Wall Textures - Tutorial Request  | |
| |
|
  | |
| | Wall Textures - Tutorial Request |  |
|


